[Home] [Contents][Figures] [Search] [Help]
The techniques described in this book, and in more detail in this chapter, should allow the woodworker to at least make satisfactory experimental models, and with practice perhaps showpieces. Not much is required in the way of tools beyond a small power table saw and a drill press, without which, though, you will not be able to do a very good job.
Satisfactory puzzles can be made from a variety of woods available at the local lumberyard. The lumber should be well seasoned, planed, and especially not badly warped. Poplar, basswood, fir, and pine are suitable woods for experimental work. Oak or cherry will produce a more finished product. For light and dark woods, as in checkerboards, birch and walnut can be used. For multicolor projects, fancy woods in a great variety of colors are available from specialty cabinet wood suppliers listed in any woodworker's magazine.
Most domestic hardwoods are quite unstable with changes in humidity, and this can be a serious problem with interlocking puzzles. Honduras mahogany and cedar are better in this respect. Some of the so-called exotic tropical woods such as rosewood, tulipwood and ebony are better still; and teak, cocobolo, and padauk are best.
Every puzzle described beyond Chapter 2 is made from straight sticks, and well over half use straight square sticks. Making uniform accurate square sticks is by no means an easy task, especially when the lumber is slightly warped, as all lumber is. But it is absolutely essential to success. If the lumber is quite true and the saw is adjusted perfectly, you may be able to rip-saw the sticks straight away. Usually not all of these conditions are met, so you saw the sticks slightly oversized and then plane them down to exact size. Access to a small thickness planer will make this operation much easier. You can do many sticks at one time and save them for future use. If so, you will want to standardize on one or two sizes. One-inch-square sticks would be a good first choice. For puzzles using large numbers of cubic blocks, such as the solid pentominoes, พ-inch is large enough. For a few, such as the truncated octahedra, you may want to use 1ฝ-inch-square stock. You will also require a measuring instrument. Vernier calipers are the absolute minimum, dial calipers are better, and if you are serious about this project, by all means use a micrometer.
The second and final sawing operation is to cross-cut these sticks into short stick segments or blocks. For this you will need a small table saw equipped with some special jigs. Much trouble will be saved if the saw makes a smooth cut that requires practically no sanding. The very fine-toothed so-called plywood blades do this. At the first sign of dullness they should be sharpened or discarded. Increased noise, resistance, or inaccuracy of cut are all signs of dullness; and when burn marks start to show the blade is hopelessly dull.
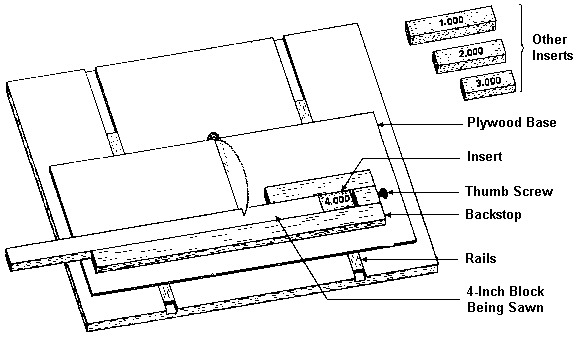
Nearly all puzzles are made of large numbers of identical blocks or sticks. The only way to saw these accurately and efficiently is by using special jigs that you make. Shown in Fig. 206 is a simple and very useful jig for sawing short square sticks and blocks. Its body is a solid piece of plywood that slides on a pair of rails in the miter grooves of the saw. Various inserts adjust the jig for making different sized blocks. The thumbscrew on the right allows for minute adjustments, such as might be necessary when changing saw blades. When correctly adjusted, all cuts should be accurate within plus or minus 0.005 inches.
Fig. 206
A second very useful jig is the one already shown in
Fig.
90. With just these two jigs, one can make about half of the puzzles
described in this book. A slightly modified version of the diagonal jig, shown
in Fig. 207, is used to make rhombic dodecahedral blocks. As the stick is
rotated to four different positions, four saw cuts are made, bringing the end to
a pyramidal point. The stick is then advanced a certain distance determined by
the spacer block, and four more shallow cuts are made. In the illustration, the
final cut is being made that severs the finished block from the stock. Thus it
is not necessary to place one's fingers near the saw. For one-inch stock, the
length of the spacers is
![]() plus the saw kerf.
plus the saw kerf.
Fig. 207
A jig for sawing the eight corners from a cubic block to make truncated octahedra is shown in Fig. 208. The same sort of 45-degree cradle is used, but it forms an angle of 35ผ degrees to the miter grooves when viewed from above.
Fig. 208
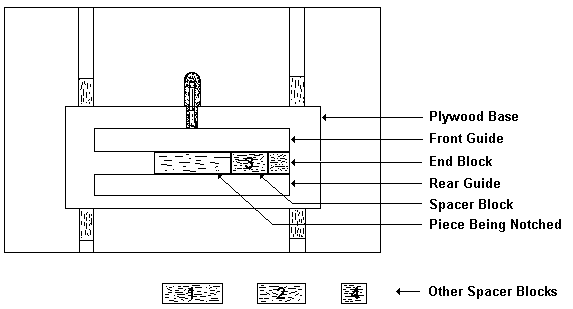
Notched pieces such as are used in the standard six-piece burr are notched using the jig shown in Fig. 209 in conjunction with a dado blade in the saw. Spacer blocks are used to position the pieces properly.
Fig. 209
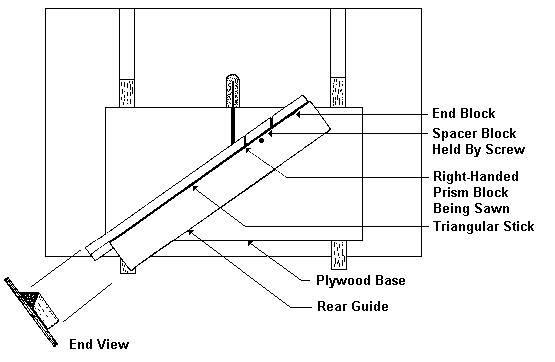
For all of the puzzles that use equilateral-triangular sticks, the cuts are made using the simple jig shown in Fig. 210. which holds the sticks at an angle of 54พ degrees viewed from above. Again, various spacer blocks are used to position the stock correctly.
Fig. 210
There are many other similar special-purpose saw jigs, but the most basic ones have now been described and the reader should be able to figure out the others.
For puzzles that use pins and holes, if the holes are drilled accurately, you should be
able to use a dowel
![]() -inch smaller in diameter than the hole. Buy the dowel stock in any
hardware shop. Always use a simple jig arrangement to position the pieces accurately while
drilling - never just a pencil mark. It is best to use a special bit with a spur point
made for wood rather than the ordinary bits that are designed for drilling metal and will
not make a clean accurate hole in wood. Some woods are much easier than others to drill
cleanly. Walnut is excellent.
-inch smaller in diameter than the hole. Buy the dowel stock in any
hardware shop. Always use a simple jig arrangement to position the pieces accurately while
drilling - never just a pencil mark. It is best to use a special bit with a spur point
made for wood rather than the ordinary bits that are designed for drilling metal and will
not make a clean accurate hole in wood. Some woods are much easier than others to drill
cleanly. Walnut is excellent.
Most gluing is done using jigs to position the blocks accurately. A flat surface, straight edge, and combination square will suffice for gluing cubic or rectangular blocks. The simple M-shaped cradle shown in Fig. 211 is very useful and is used for making practically all of the puzzle pieces in Chapters 8, 9, 10, and 11.
Fig. 211
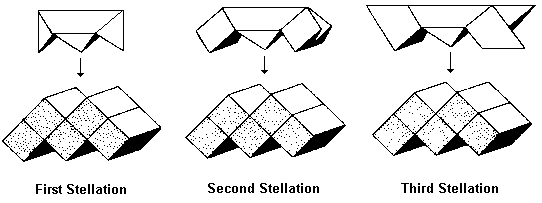
Many puzzles are most easily and accurately made by holding all of the blocks tightly together in the assembled configuration using tape or rubber bands and then selectively gluing them together. Examples would be the Three-Piece Block Puzzle, the Four-Piece Pyramid Puzzle, and the Octahedral Cluster Puzzle. Wax or bits of waxed paper are used to prevent unwanted joints from accidentally becoming stuck together. Sometimes, some of the joints can be subassembled first, with only the final joints being glued in the assembled shape, to ensure that the puzzle will be possible to assemble. For puzzles with multiple solutions, such as the Second Stellation in Four Colors, this method does not work and the only alternative is meticulous accuracy.
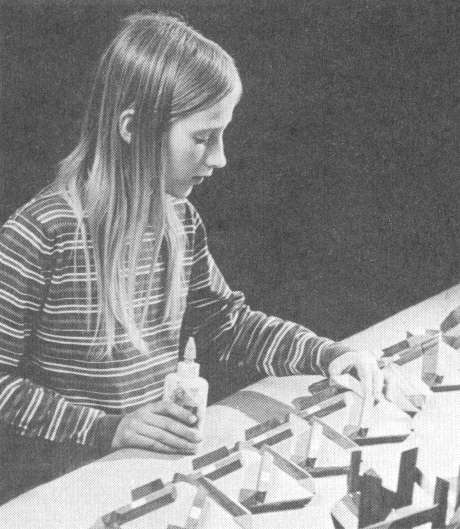
The most difficult puzzle pieces to glue are those of the Scorpius and Jupiter families. The base of the gluing jig for these is a vertex of a rhombic dodecahedron or triacontahedron. The author's were made by a skilled machinist using a milling machine. One pattern was used to cast a mould from which several more were cast in epoxy. The photograph (Fig. 212) shows one of the elves gluing Jupiter pieces.
Fig. 212
The most satisfactory glue I have found is the yellow aliphatic resin type, sold under various brand names. It is strong, fairly fast setting, and resilient enough for the joints not to pop apart when the humidity changes.
Interlocking puzzles such as the rhombic dodecahedral type of Chapter 8 are most satisfactory when they fit snugly but not too tightly. The pieces are made and glued to be slightly too tight and are then carefully sanded down. The less sanding the better, as excessive sanding rapidly destroys the accuracy so carefully built in up to that stage. A belt sander with #150 grit is handy. Sometimes pieces can be exchanged between a puzzle that is too tight and another that is too loose. The last step is to break the sharp edges of the pieces with a file and round sharp corners using sandpaper. Thin clear lacquer applied with an artist's brush will improve the appearance and seal out dirt. For a final touch, rub with extra fine steel wool, wax, and buff.
These brief woodworking hints are necessarily and purposely just that and not detailed directions. To give workshop blueprints for each puzzle would not only take a prohibitive amount of space but would also I think detract from the theme of the book. Part of the fun is figuring out how to do things. Because of the simple repetitive nature of geometrical dissections in general and the few recurring angles, the individual blocks are easier to saw out than one might suppose. By the same token, any error in sawing can become cumulative and surprisingly excessive when blocks are glued together. Accuracy at all stages of the work is most important.
Beyond that, the greatest problem in puzzle craft is coping with uneven expansion and contraction with changes in humidity. It can be as much as 2% from summer to winter. If it were uniform in all directions it would be no problem, but it can be 10 times as much across the grain as lengthwise. The result is that higher humidity tends to make most interlocking puzzles tighter. The burr puzzles are especially susceptible, and so the more stable types of woods should be used for them. Other designs, such as those of the Scorpius and Jupiter configurations, are barely affected by humidity - they just grow or shrink overall. By studying the geometry of a puzzle, sometimes one can find ways in the construction to minimize the effects of humidity. For example, in puzzles like the Three-Piece Block Puzzle or the Octahedral Cluster Puzzle, if the blocks are arranged such that their grains all run in the same direction in the assembled puzzle, the result will be an almost complete cancellation of the effects of humidity.
Start with the easier projects such as the two-dimensional dissection puzzles, the standard burr, and cubic blocks. As you gain experience with these and are able to make them to your satisfaction, then you may wish to progress toward the more difficult models. The arrangement of the chapters is roughly in order of increasing difficulty except where indicated otherwise. Do not be too disappointed if you find the Star Prism Puzzle or the Jupiter Puzzle to be beyond your woodworking capability. Curiously, it is the simpler puzzle that turns out almost invariably to have the greater recreational potential. For some indication of the author's personal preferences and recommendations, note the amount of space devoted in this book to each puzzle design.
For more information the reader is referred to my previous book, Puzzle Craft, which is oriented more toward the practical woodworking aspects of geometrical puzzles.
| ฉ1990-2012 by Stewart T. Coffin For questions or comments regarding this site, contact the chief metagrobologist: |